
How To Update and Organize A Small Pantry


In this post I am sharing how to update and organize a small pantry without spending a fortune. Back in 2013, my Husband and I purchased our very first home. We loved so much about our new home and we still do! We were so excited to have more space in our home compared to our former rental. Having a new kitchen was super exciting for me! The Pantry specifically needed to flow better than it did. Our updated pantry small remodeling project was something we knew we would approach at some point.
I always felt like I didn’t utilize the Pantry as well as I could. My organizing skills are not as great as my Hubs. The top of the pantry always seemed to go from put together, to boxes stacked on top of each other within days. I knew there was a better system for it, and I knew some type of rearranging needed to happen.
In an attempt to make the pantry more efficient I tried different storage/organization solutions. I’m in the kitchen a lot and I cook a little. Okay, I cook a lot!
Because of my frequent forays in the kitchen something had to give in the area of efficiency.
After trying different ways to organize the pantry, which as you can see in this picture below was a Disaster. I can’t even believe that I am showing you this, but this is real life and not Pinterest lol. Using some bins did help contain some of the mess. I did make some improvements to the order of things.


Tackling The Pantry Project
Honestly if I went into the kitchen it was to cook.
The last thing I wanted to do was organize it too. So, I let it just pile up with mess, after mess, and just got to the point where something had to be changed.
I went on a major overhaul all over our home, and one of the first projects was getting the Pantry under control with a proper system in place.
Our updated pantry was one of the small remodeling projects that we wanted to do over the course of time.
Before tackling most of the “future” projects we knew we wanted to actually do life in the house for a while first.
We also are budget conscious people and wanted to be realistic as to what we would do first financially speaking. The most bang for our buck was the game plan!
How to Update and Organize a Small Pantry: The Right Functionality
Sometimes you know immediately what you want to do in a space. Other times you have to really do life there first to get a feel for how it can function best for you. The latter was the case for us with our pantry.
There was nothing “wrong” with our pantry. It was functional and it did what it was supposed to do. It housed our dry goods, broom and some overflow items like trash bags, and foil.
In our home there are a lot of builder’s grade products that are completely functional and nothing is wrong with them. But the shelves were not the style we really liked.
Our motto is work hard, save up, have a plan, and change things the way you want without a major financial burden if possible.
It was time to switch things up and tackle the Pantry

Recently I purchased containers inspired by “The Home Edit” to organize our Kitchen Pantry and make it more manageable. I devoured that book and was soooo motivated to get started.
You could say this book was the catalyst for our updated pantry small remodeling project! You can find the The Home Edit book here.
Why We Updated Our Pantry
Our Pantry had a few issues like the vented shelving. The design of these shelves allowed things to fall through the bottom. Even after organizing it still felt un-done.
I thought some solid shelves would be perfect to keep things from falling through.
Our Kitchen Pantry is not wide but has a ton of vertical space that was not being utilized. Whenever I tried to use that vertical space boxes just ended up on top of other boxes.
We ended up just stacking things on top of other things at the top. We even used the floor to store products and wanted a better storage solution.
The pantry had the vented wire shelving and after living here for several years it was time to change them. I was on You tube getting ideas and inspiration for some organizing for a room in our home. I stumbled upon someone re-doing their utility closet with adjustable shelving.
Our Simple Pantry Update: Starting the Project
I knew immediately that we (my Husband and I) could easily do this project. Initially we were waiting to re-do our pantry with wooden shelves. I told my Husband about the project and he reminded me that he had already done a similar project in our garage with an adjustable track system. Again, he’s the more organized one for sure!
I sent him a few links to look at. When the Hubs came home from work, we decided to pop over to our local Lowes and purchase what we needed.
We did some eye-balling [really] and decided we would just grab what we thought we needed to start the project and come back for any additional items later.
We purchased two of the tall white Tracks, a can of spackle, some drywall screws, brackets, and paint. The Pantry width was not yet measured so getting the shelves had to wait.
There are certain things we just can’t eyeball like the width of our pantry. That’s how quickly we got the ball rolling on this project.
We ended up getting the shelves at Lowes and had them cut to size. The Wall-mounted shelves at Lowes come in different finishes, we just went with white.
How to Update and Organize a Small Pantry : Budget Friendly
It was not an expensive project to do and we had a small allowance for around the house projects that we saved. I think this Small Pantry Remodeling project could be tackled by just about anyone. It is truly a D.I.Y friendly project.
We used a drill, level, Spackle, a sanding block, paint, screws and some safety gear. Special tools were not necessary for this project.
The Pantry is a small enclosed space so I opted for a Paint that had low VOC’s. The look we were going for was clean and bright. We literally bought “ultra-white” to keep it bright in the pantry. This small space didn’t require a lot of paint and the remainder will be used for two other small projects.
Thirty dollars for 2 paint projects just made affordable sense to me.
Painting, Sanding, and Repairing
I didn’t want to inhale too many fumes and dust from sanding the areas that had to be filled in in the sheet rock. I wore a dust mask to keep irritation at bay.

Removing the old wire shelves left huge holes in the sheet rock. The screws were super hard to remove, and I ended up with a few bruises and bleeders.


After spackle, and sanding the refinished sheet-rock I used a vacuum with hose attachment over the entire space. I wiped the sanded spots with a wet cloth.

The next part of the project required using a level, and tape measure to figure out where we would make our holes. We pre-drilled some holes after we measured where we wanted each shelf to go and the two main grids.

I painted after everything was clean and dry and we finished up by using those pre-drilled holes to put both mounting bracket tracks in.


How To Update and Organize a Small Pantry: The Tools
Our updated Pantry small remodeling project was just that. It took us a half day to start and complete. The products that we used were easy to work with and anyone can do it.
My favorite part is that the shelves are all adjustable. You can find the Wall Mounting Rubbermaid Fast Tracks here or at your local Lowes. The brackets to hold the shelves here. Shelves can be found right here. The Screws for this project can be found here.
Always measure, our Pantry may have different dimensions than yours.
Finally, we have utilized the dead vertical space.
This project also freed up cabinet space since my most used appliances are housed there. Hello Air Fryer, and Instant Pot!! My little kitchen helpers LOL
We Will Use This Process Again
We have already decided that we will be doing this to all the other storage closets in our home. The shelves are Melamine/Laminate and they are water, stain resistant, and very sturdy.
The fact that they come in different finishes and can be cut at your local store is a WIN! My Husband had that great idea since we don’t own a saw.
The screws used for this project can hold up to 50 lbs. You don’t even have to hit a stud with these bad boys. Here’s a link to the Dry Wall Anchors we used.
Our goal is for this pantry to last so using strong and durable products was key.
Things That Made This Project Easier
I used a cap for my hair, safety glasses, and plastic gloves. It’s kinda hard to paint the ceiling when paint drips in your eye, or on your hair. Unfortunately, I have experienced both!
Constant interruptions, means you have to get creative. Lol! It was necessary to keep our child occupied with a show and some snacks.
If he needed something, I needed to quickly stop what I was doing. I highly recommend wearing gloves to paint.
The ability to just pull off disposable gloves was so handy!
We only took breaks to eat a quick bite of food.
Taking a break allowed the paint to dry while we had a quick meal.
My Husband and I took shifts with watching our toddler and opened the windows, so the fumes were at a minimum. This was the main reason for purchasing the paint that had low Voc’s.
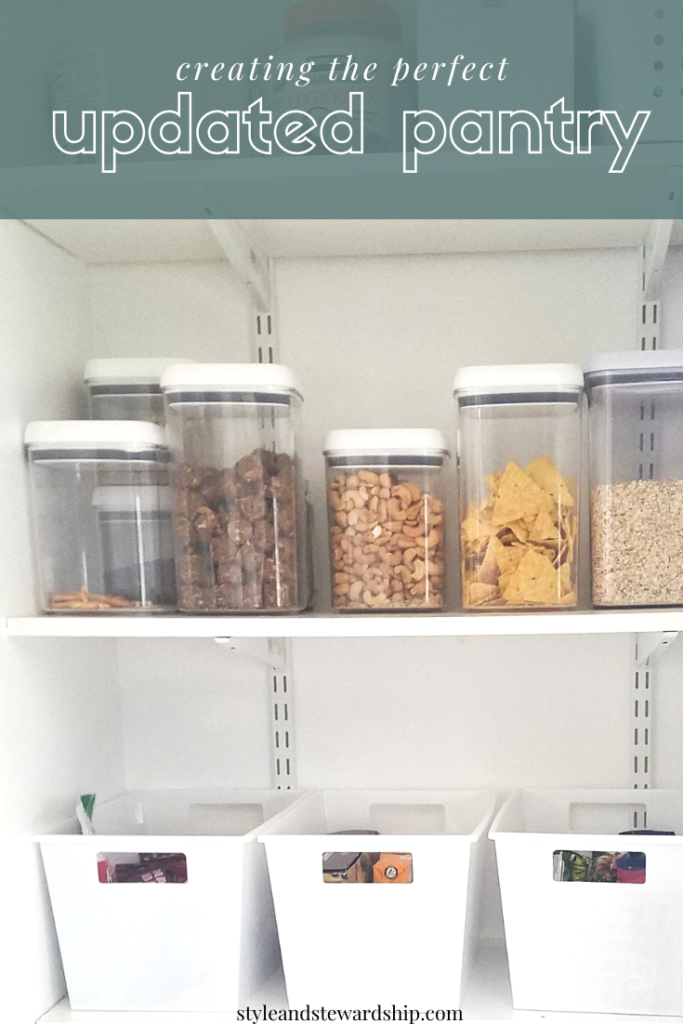
Our Updated Pantry: Bins For The Win
I utilized a few types of bins to contain and organize the Pantry items. Dollar Tree Bins in white for a buck each. You really can’t beat that! OXO bins that were large enough for Cereal and Oatmeal. You can find them here.
We reused some Sterilite bins that we already had and some Better Homes and Gardens Clear containers.
Better Homes and Gardens Clear Storage Containers can be found here
These BHG Containers had the same look as the OXO bins. The OXO bins have a button that you press down. The Better Homes and Gardens has a flip top. I love that with the clear bins you can see Exactly what you have and boxes don’t clutter your space.


Some Tips For Home Remodeling Projects
- Figure out what you want to tackle first and if you can delay the gratification for a bit live there for a while First
- Save up for the project that you are considering
- Purchase things little by little, or create a line in your budget for the project to consistently save up for
- After you have saved up shop around for the best products for your update
- Consider not just what it will cost financially, but time-wise as well
- Execute the project with the help of friends/ your spouse/ or a family member
- Have snacks on-hand or leftovers ready to pop in the microwave to avoid “Hanger”
- Try to buy your products in-person if you can, you don’t want to have to send something back through the mail (unless the store is local)
- Check the weather for the days you will be working on your project. If you have to open your windows and it’s raining you don’t want that moisture to slow the paint drying time
- Take before and after pictures It will encourage you as you take on bigger remodels, and projects
- Donate any items that can still be used (our old shelves found a new home)
Be Flexible During The Process
Keep in mind that few projects will be “perfect” and be flexible because rarely are there NOT un-foreseen issues. I had no idea taking out the old racks would leave huge holes and require additional steps and time.
We have some other updates that we are slowly doing in our home that I can’t wait to share!
** These are all tips from a DIY’er and not an expert. Be realistic and employ a professional if necessary. Attempt updates, remodels, and DIY projects at your own risk.
I would love to hear from you.
- Have you ever tackled a DIY project in your home?
- If you did a DIY project how did it go?
- What tips can you share about the projects you’ve done?
This post contains affiliate links and if you purchase through the link I may earn a commission at no additional cost to you.
You can read S+S Disclosure Policy Here
If this is your first time on the Blog thanks so much for stopping by. If you want to know a bit more about Style and Stewardship you can check out the About Page, all Blog Posts Here, Connect with me on Instagram, Subscribe to the Podcast, and Subscribe to my YouTube Channel.


